
Create a New Calendar:
In addition to the default Microsoft Outlook Calendar, you can create other Outlook calendars. For example, you can create a calendar for a specific project or workflow, separate from the rest of your work calendar. These additional calendars will allow you to better organize projects and events.
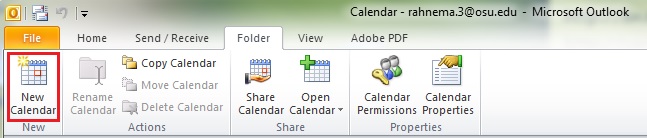
1- Select the folder tab and click on the New Calendar:
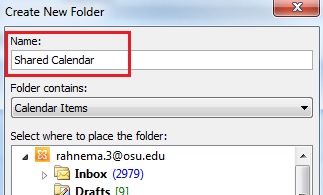
2- Name your new calendar and click OK:
3- Your new calendar appears under your list:

View Calendars:
Side-by-Side View:

Overlap View:


This view provides an easy way to compare calendars, find overlapping appointments or gaps in appointments. Additionally, the color coordination assists with identifying the different calendars, quickly change the active calendar, or switch between them effortlessly.
Share a Calendar:
When you use Outlook with an Exchange account, calendars can be shared between people including your students. Calendar sharing is not limited to the default Calendar that is created in all Outlook profiles. You can create additional calendars as demonstrated above and choose which of those calendars to share. For example, you can create a calendar for a specific project or reading room schedule and share it with your co-workers and students for seamless and transparent communication. Optionally, you can grant them permission to modify the events and appointments in the calendar.
NOTE: Any message, contact, or task in Outlook can be marked private so that others don’t see the item in a shared folder.
1- Select the calendar you are interested to share:

2- Then select the Share Calendar button from the Navigation Pane’s Share menu:

3- In the To box, enter the email address of the person you want to share/see your calendar (the recipient).

4- In the Subject box, a subject should prepopulate. However, you may type a customized subject for the e-mail message.

If you are sharing your default calendar, you will receive additional options to limit the viewing capabilities of the person you are inviting to see your calendar:
NOTE: The default Calendar in Outlook is created in each Outlook profile. This folder cannot be renamed or deleted.
a. Availability only:

b. Limited details:

c. Full details:

In addition, you can request permission to view the recipient’s default Calendar. To do so, select the Request permission to view recipient’s Calendar check box.
If you are sharing a created calendar you will not have these options. However, you can permit the recipient to assist in maintaining this calendar. To do so, select the Recipient can add, edit, and delete items in this Calendar check box:

5- Click Send to share your calendar with the recipient.
Revoke Access to Calendar:
At any time, you can change or revoke someone’s access permissions to your calendars.
1- Select the Calendar Permissions from the Navigation Pane’s Share menu:

2- On the Permissions tab, in the Name box, click the name of the person whose access permissions you want to change.
3- Under the Permissions section, select None to revoke access or any of the other options to change permission level.
